
I’m testing my house for radon, and you should also. Winter is the best time to test your house for radon, which is one of the reasons I am testing it now. What is radon, and why am I testing for it? Keep reading.
What is radon? It is an odorless, tasteless, invisible gas that also happens to be radioactive. It is produced naturally from the decay of uranium, which occurs naturally in soil across the United States, and other countries and continents. The United States Geological Survey (USGS) has this neat map showing uranium soil concentrations across the US. Due to its radioactivity, radon is a carcinogen. In fact, it is the second leading cause of lung cancer after smoking. Radon gas is pretty much everywhere, both outdoors and indoors. Like all carcinogens, there is no safe level of exposure. You can’t completely avoid exposure because it is naturally occurring, but it is best to avoid it if you know it is present.
The US EPA estimates that the average home has an indoor radon concentration of 1.3 pCi/L, this means pico Curies, a unit of radioactivity, per liter of air. If your indoor air is above 4 pCi/L, then they recommend you fix your home. I’ll get to what fixing your home means next. Finally if the indoor air concentration is between 2-4 pCi/L, then they recommend you consider fixing the house. It is in that range that the concentration starts to get high enough above background that you might want to take action.
What happens if the radon concentrations in your house are high? First, don’t panic, your house can be mitigated to reduce the radon concentrations. You can hire a professional to install a mitigation system in your house. A mitigation system can either prevent radon gas from entering the house, or it can remove it from the house once it gets in. For example, one type of system sucks or pulls gas from beneath the house and then pipes it safely above the house where it can disperse into the atmosphere. Mitigation systems can be very effective and will greatly reduce your risk of lung cancer due to radon exposure.
Is your house at risk? As shown in the USGS map, some areas have higher concentrations of uranium in the soil than others. Areas with higher soil uranium concentrations will generally lead to higher radon gas concentrations. Also, houses with a crawl space will generally have less radon infiltrating the house than houses built on a slab or with a basement. The crawl space can allow the radon to dissipate before rising into the house. Houses with cracks in their slab are more susceptible because the cracks serve as a pathway for the radon to rise into the house. Also, pipes and conduits such as for wires from the house to ground can also allow radon to enter if they are not properly sealed.
So how do you find out if elevated levels of radon exist in your house? It’s fairly easy. Many states regulate the testing of radon, so you may try contacting your state radon department if it has one. Most of the time, you can go to your local home improvement store and buy a test kit for about $20. That’s what I did. The test kit I bought included two little containers that detect radon. The test kit had certain specific directions for the test containers such as they needed to be at least three feet off the floor, at least three feet from an exterior wall, etc., and they needed to be open for four days. The test containers were supposed to be placed six inches from each other. I presume you get two that are supposed to be placed in the same location for replicability. So here are the high tech test kits.
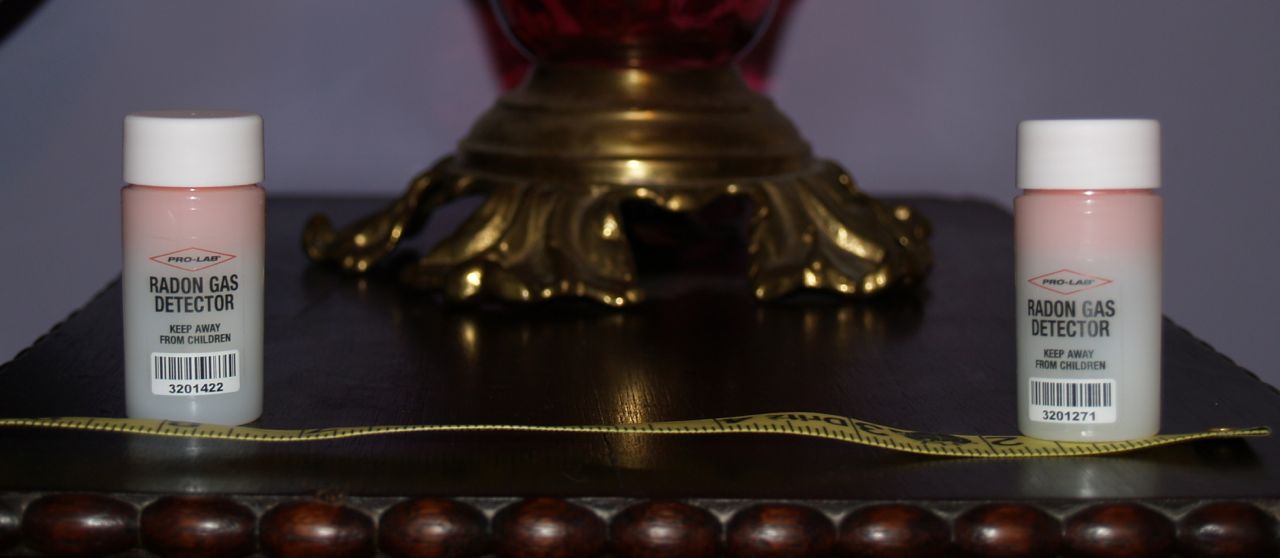
Both radon detectors placed for testing
Yes that is a tape measure in the photo because it said to place them six inches apart, and I’m an engineer. Now be quiet. The detectors should be placed in one of the lowest habitable rooms of the house. My house is built into a hill such that the front door on the first floor is ground level, and the back door of the second floor is also ground level. I chose to place the detectors in the guest room, which is on the first floor and in the back exterior corner of the house. The back wall and 3/4 of the side wall of the guest room are underground exterior walls, and thus this room would be one of the most susceptible to radon infiltration from the ground. The room that serves as my office and workout room is next to the guest in the front exterior corner of the house. Two of its walls are also exterior, but only about 1/3 of its side wall is actually underground. However, there is a crack in the slab about two feet long in the office, so I considered whether the test kits should be placed in this room. [Due to the extensive renovation I’ve been doing on this house, I know where all the cracks and openings are.] That crack could serve as a major route for radon to enter the house. However, I ultimately decided that the guest room would be more susceptible to radon infiltration because of the amount it is underground.
After choosing in which room to place the detectors, I then found a good location that was far enough away from an exterior wall and above the floor. I then proceeded with the testing protocol. I unscrewed the containers and let them sit for four days. Whew, that was exhausting. I deserved a drink after initiating that test. Here is one of the detectors unscrewed. It’s quite simple looking.

Radon detector open to run test
After I let them sit for four days, I screwed the caps back on, filled out the form that came with them, and mailed them into the lab. It cost $30 to have them tested, so with the cost of the kit, the entire thing cost me $50. I consider $50 a small price to pay to make sure I am not unknowingly breathing in a carcinogen everyday. I’m currently waiting for the results from the lab, and I will update my blog when I get the results.
One final note, I said at the beginning of this post that winter is the best time to test for radon. The reason for this is winter tends to be the time that the radon concentrations in a house would be at the highest. When the weather is nice, people tend to open windows for ventilation instead of using the AC or heater, and people just tend to open doors more often to go outside for whatever reason. Thus in the winter, the house is more closed off, and radon concentrations can build up due to less exchange of the indoor air with the outdoor air. Where I used to live in south-eastern part of US, I probably had windows open more often in winter, as I constantly used the AC in the summer, so this might not hold true. That and the fact that indoor air concentrations can vary day to day, is why experts recommend that if you get high levels detected with a short term test, you consider doing a longer term test such as over several months, to determine what the longer term average is. The test kits do have false positives, especially at lower concentrations, so if you test your house, and it comes back high, once again, don’t panic. Test your house again, this time with a longer term test, and see what the longer term concentration is, and then determine if you need to take action. However, don’t remain ignorant about the risks. Test your house; it’s important and could save your life.
For more information:
Pingback: Short Term Radon Test Results | Geeky Girl Engineer